Let’s get your Solar iBoost™ working…
As we start, please familiarise yourself with these items referred to in this troubleshooting:
Solar iBoost™ Original Main Unit

Solar iBoost+™ Main Unit

Solar iBoost™ Sender & Clamp

Solar iBoost Buddy™

Most common topics – Click to expand the most common on screen messages
'Heating by Solar'
| In correct operation…. | There may be a problem…. |
| This message means that the clamp is detecting excess PV energy generation which the Solar iBoost™ is capturing and diverting to the immersion heater. The lightning LED flashes blue and the screen indicates the value in kW.
– To test this is correct you can switch on a kettle and you will see the energy diversion stop or reduce. Another way is to switch off as many home appliances as possible and the diversion levels should rise in line with the increased excess energy. |
If this message appears and heating occurs when there is no excess solar generation e.g. at night
Check the orientation and location of the clamp as it is detecting a current flow owing to: 2. It is fitted after Henley blocks and sending an incorrect reading. 3. On site battery storage may be exporting small amounts of power to the grid. This can be overcome by adjusting the battery storage or Solar iBoost+ cut in thresholds (Solar iBoost+ 100W) so they do not conflict. Only Solar iBoost+ models from May 2019 can be adjusted, a solution for earlier and original models is to replace the Sender with a Sender 250 available in the on line shop. |
'Water Tank Hot'
| In correct operation…. | There may be problem…. |
| This message means that there is excess PV generation available but the immersion heater thermostat has activated as it has reached its set temperature. | If water is not hot: 1. Thermostat in immersion may be set too low 2. Thermostat may be faulty and permanently open. A qualified electrician should inspect the installation. Follow this guidance |
'Water Heating Off'
| In correct operation…. | There may be a problem…. |
| This message means that no excess energy is detected and the system is in standby. Excess energy levels must be >100W (Original model >200W) |
|
'Sender Battery Low'
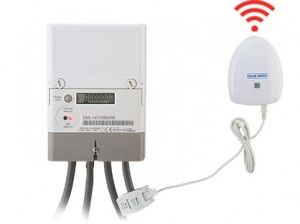 |
You will usually find the Solar iBoost™ Sender and Clamp located at the property’s main electricity meter (NOT the PV meter) or the consumer unit.
Replace the 2x AA batteries and we recommend that the Sender be installed vertically rather than flat. Do not use rechargeable batteries. |
'Lost Signal to Sender'
The unit is no longer receiving messages from the Sender unit. Your solar panel system will still operate as normal but the Solar iBoost+ will not heat your water from your PV but you can select Manual or Timed Boost. Possible causes:
- Batteries in the Sender may be exhausted.
- Solar iBoost+™ is positioned too far or too near to the Sender.
- Sender unit pairing button may have been pressed inadvertently outside of the pairing process. Re-pair the Sender and Main Unit following these instructions. Pairing the sender
'Maximum Power'
The Solar iBoost+™ checks for overload at initialisation and during normal operation. If overload of any of the heating circuits is detected the output is disabled. Check the load of the immersion heater and supply voltage are within the Solar iBoost™ given specifications. The warning can be reset by power cycling the Solar iBoost+™ unit once any issue has been eliminated.
'Unit Cooling'
The Solar iBoost+™ is now in a cooling mode – check that the main unit is clear of obstructions and that there is adequate airflow around it. There should be 100mm clearance all around the Solar iBoost+™ . This operation may cycle periodically to maintain standard operating temperatures of the unit.
If the Solar iBoost+ is installed in a cold location such as an out building or loft space, the unit cooling mode may operate more frequently especially in winter.
Display Screen Blank
| In correct operation…. | There may be a problem…. |
|
This would mean there is no power to the unit, please have an electrician check your power supply to the Solar iBoost+
|
If this message appears and there is power to the Solar iBoost+ it will need to be returned for further investigation. Please note you will be dealing with mains electricity and therefore a qualified electrician may be required to remove the unit in order for it to be returned. Please follow this link to fill in our online form
|
Other topics
How do I check that my Solar iBoost™ is working correctly?
Check the display screen for any messages, these are all explained above. You can do the Kettle Test to check the Solar iBoost™ functions when excess energy is detected. It does not establish that the detection clamp is correctly located, use this document to guide you to the correct clamp location
My Solar iBoost™ has not registered any savings
The Solar iBoost operates automatically in the event that excess PV energy generation levels or export levels exceed 100W (Original model >200W)
- Check the Solar iBoost™ display screen for any fault messages and follow the relevant guidance.
- If a normal operating message is displayed follow the guidance above relevant troubleshooting
My Solar iBoost+™ fan is noisy
In normal operation the Solar iBoost+™ has a fan that runs much like a computer fan and the noise level is quite discreet. The most common causes of the sound disturbing an owner are; the main unit has not been secured to the wall using all 4 screws provided, the terminal cover is not seated and screwed fully home OR the rubber stop on the inside of the cover designed to cushion any vibration has been removed.
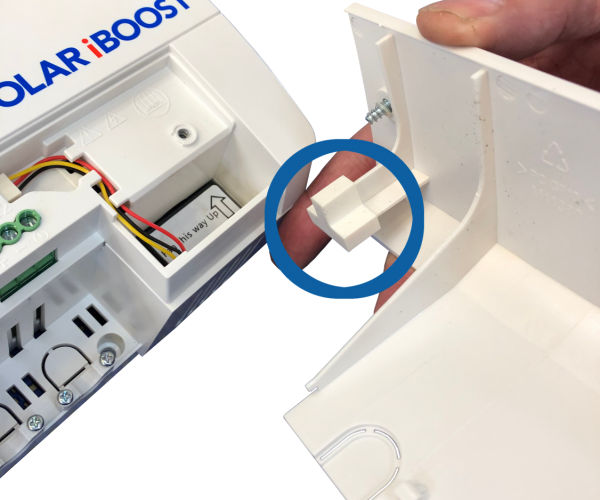
First of all confirm that 4 screws secure the main unit to the wall. We’ve designed the Solar iBoost+™ to give the user access to clean the fan so it’s easy to resolve this issue by following these steps:
- Shut down the power supply to the Solar iBoost+™
- Remove the front terminal cover using the 2 screws and check the rubber stop is fitted on the inside. If there is no rubber stop email Marlec to request one.
- Optional – at this point you can carefully unclip the fan BUT ensure you note how it is fitted as the orientation is important for correct operation. Blow any dust off the fan blades and refit.
- Reposition the cover onto the Solar iBoost+™ and screw to full tightness so that the cover is flush with the main unit.
- You can test the fan operation by pressing any button to initiate the back light then press and hold the Display button for 5 seconds. The fan will now operate for approximately 10 seconds
You can download this guide for your convenience. Solar iBoost+ Fan Operation
My Solar iBoost+™ is displaying in a different language
This is simple to fix by following these instructions
- Press any button on the Solar iBoost+™ to initiate the backlight
- Whilst backlight is still on press the Boost button, hold for 5 seconds and release. The language will have cycled to the next in its menu.
- Repeat 2 until the desired language displays. Normal operation resumes and all data is saved.
Download this guide for your convenience – Changing the Language on Solar iBoost+
My iBoost Buddy™ displays "Sender Battery Low"
This means that the batteries in the Sender require replacement at the soonest opportunity.
You should find the Solar iBoost™ Sender and Clamp located at the property’s main electricity meter (NOT the PV meter) or the consumer unit.
Replace the 2x AA batteries and we recommend that the Sender be installed vertically rather than flat. Do not use rechargeable batteries.
My iBoost Buddy™ displays "Not Bound"
My iBoost Buddy™ displays "Lost signal to sender"
This means that the main unit is no longer receiving messages from the Sender unit. Possible causes:
- Batteries in the Sender may be exhausted.
- Solar iBoost+™ is positioned too far or too near to the Sender.
- Sender unit pairing button may have been pressed inadvertently outside of the pairing process. Re-pair the Sender and Main Unit following these instructions. Pairing the sender