Lets get your Rutland working…
As we start, please make sure you have the below testing equipment:
Multimeter


Test 1 - Test the Shutdown of the Turbine using the Regulator Switch
Whilst the blades are rotating shutdown the turbine using the switch on the regulator. Perform this test in low to mid windspeeds.
| Result A | Conclusion / Next Action | |
| Slows to an idle and does not pick up speed with stronger winds. | This indicates there is a circuit between the regulator and turbine | If in doubt continue to Test 2 |
| Result B | Conclusion / Next Action | |
| Turbine continues to rotate without any change | This indicates there is not a circuit between the regulator and turbine |
|
Coming Soon
Test 2.1 - Open Circuit Voltage Check with the Turbine Installed
Test the open circuit voltage of the turbine.
Steps:
- Use a multimeter set to DC Volts to a level 20V if possible.
- In low winds shutdown the turbine using the regulator switch. Remove the turbine cables at the regulator and connect the turbine output’+’ to the multimeter ‘+’ and turbine output ‘-‘ to the multimeter ‘-‘.
| Result A | Conclusion / Next Action | |
| A varying DC voltage is observed in line with wind speed. | In low winds open circuit voltages up to 10V DC will typically be seen. Higher voltages in stronger winds can be seen. Note: never connect a spinning turbine or uncovered solar panel to a controller or damage may occur. | Confirmation that the turbine is operating correctly. It does not confirm that the connecting cable is capable of carrying current. Check the condition of the cable, the ends may appear to be in good condition but old cables may have unseen internal breakages. |
| Result B | Conclusion / Next Action | |
| Zero voltage reading is observed | Further investigation required | Check the condition of the cable, the ends may appear to be in good condition but old cables may have unseen internal breakages. If the cables are not damaged proceed to Test 2.2 |
Test 2.2 - Open Circuit Voltage Check with the Turbine Dismounted and on a Work Surface
Test the open circuit voltage of the turbine at cables that directly exit the turbine i.e. remove the connecting cables.
Steps:
- Use a multimeter set to DC Volts to a level 20V.
- Connect turbine output ‘+’ to the multimeter ‘+’ and turbine output ‘-‘ to multimeter ‘-‘. Spin the wind generator hub by hand as fast and safely as possible.
| Result A | Conclusion / Next Action | |
| A varying DC voltage is observed in line with hub speed. | Open circuit voltage on a bench is typically 5-6V. | Confirmation that the turbine’s generator is operating.
|
| Result B | Conclusion / Next Action | |
| Zero voltage reading is observed | Further investigation required | Check brush gear, see Test 3 |
Coming Soon
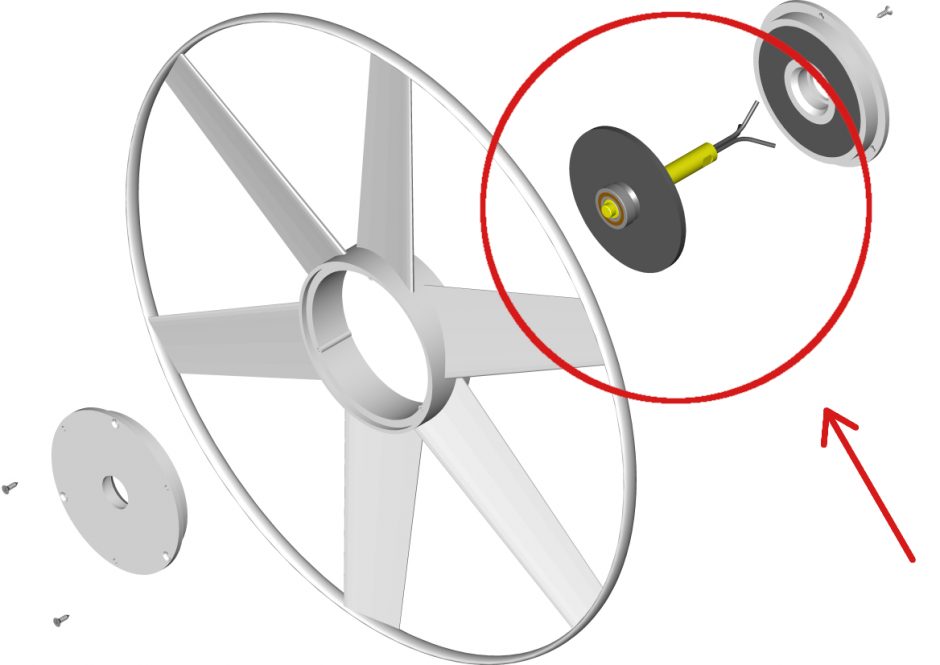
Test 3 - Check The Brush Gear with the Turbine Dismounted and on a Work Surface
Remove necessary outer parts to access the brush gear (see exploded view below that shows where this is located)
Steps
- Remove the 2 brush caps to release the 2 spring loaded brushes.
- Check that the brushes move freely in the holders and the tension of the brush springs is good so that pressure is maintained onto the slip ring.
- Remove any dirt deposits around the carbon brush which can cause high resistance and low power production.
- Change brushes as required and re-instate to return to operation.
Note: Heavy carbon deposits on brush gear is usually an indication of a reverse polarity connection (recent or historic) in the wiring system, even momentarily. Take care to observe polarity when making connections and avoid further damage.
Coming Soon
Test 4 - Not Applicable
Not Applicable
Test 5 - Check the Rectifier with the Turbine Dismounted and on a Work Surface
To test the rectifier it is necessary to remove all connections. We suggest you take a photograph to record the connections beforehand.
Coming Soon
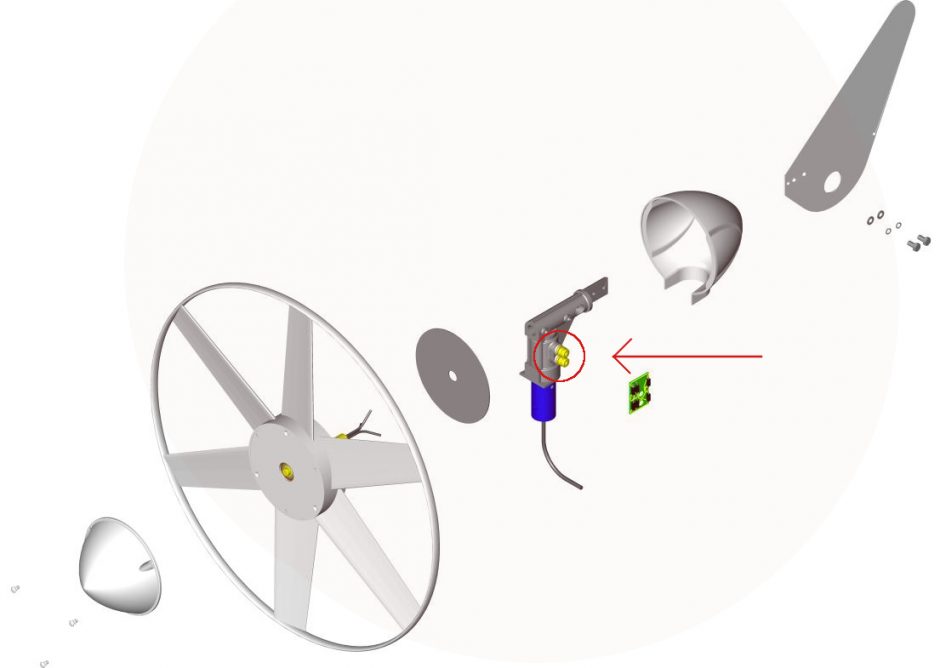
Test 6 - Check the Stator Winding with the Turbine Dismounted and on a Work Surface
Identify the 3 identical wires exiting the stator winding shaft (see exploded view below that shows where this is located). During this test take care not to allow any movement of the stator winding or magnets to avoid incorrect readings.
Note: We suggest you take a photograph to record the connections beforehand.
Steps:
- Disconnect the wires.
- Using a multimeter on Ohms range measure the resistance levels of 2 of the 3 leads and note the measurement.
- Repeat the procedure for each combination of 2 leads.
| Result A | |
| The readings should be approximately the same. | The approximate readings for your turbine should be
12V model = 3.4 Ohms, |
| Result B | |
| The readings don’t match close to the readings shown in Result 1 | Replace the faulty Stator Winding 504 here
If one or both of the magnets are damaged replace the complete hub assembly here |